Introduction
In this post, I have explained how to develop hadoop jobs in Java and export JAR to run on Hadoop clusters. Most of the articles on internet, talk about installing eclipse-plugin and using maven or ANT to build JAR. To install eclipse-plugin for hadoop, one needs to install eclipse on the same Linux machine having the hadoop installed. But, what would you do if you have installed apache hadoop on VirtaulBox-Linux or Amazon EC2 Linux Server CLI.
In this article, I have explained the easiest way to develop your java program and export JAR directly from eclipse to local file system. Beginners can start developing with basic knowledge of core-JAVA.
Note: Basic knowledge of eclipse platform required.
Steps to set up Eclipse for MapReduce
- Install Eclipse on your local window machine.
- Download and save the same version of apache hadoop tar ball as you have installed on your Linux box.
- Extract out the tar ball using WinZip or any other compression tool you have.
- Open eclipse and create your project.
- Now you need to import the hadoop libraries to your eclipse project.

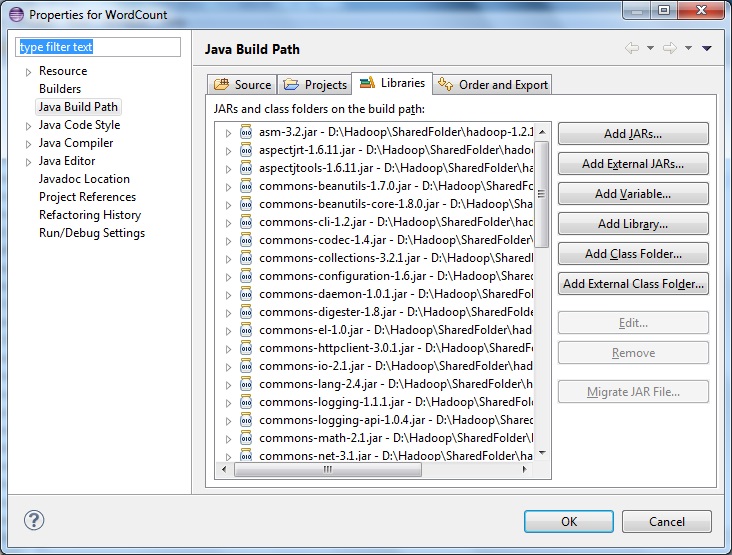
Right click your project -> Build Path -> Configure Build Path
6. Select Add External JARs
Navigate to the saved hadoop-install folder(step-2) and add all Executable Jars from below location.
If the tar ball is version 1.2.1 =>
..hadoop-1.2.1lib
..hadoop-1.2.1
If it is version 2.2.0 =>
..hadoop-2.2.0sharehadoopcommonlib
..hadoop-2.2.0sharehadoopcommon
*** For map-reduce
..hadoop-2.2.0sharehadoopmapreducelib
..hadoop-2.2.0sharehadoopmapreduce
*** For YARN
..hadoop-2.2.0sharehadoopyarnlib
..hadoop-2.2.0sharehadoopyarn
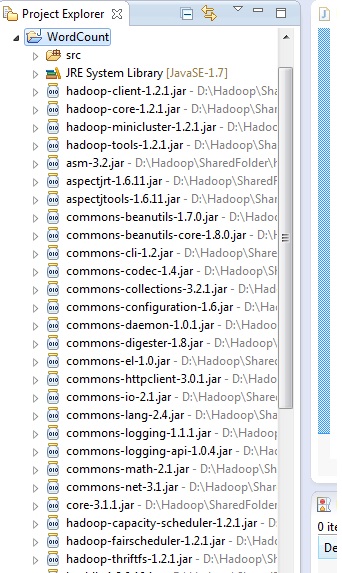
Your project explorer should look like this after adding all the required JARs

7. Start developing map reduce code for your class files and save.
8. Now you need to export your program as JAR to execute on hadoop VM.
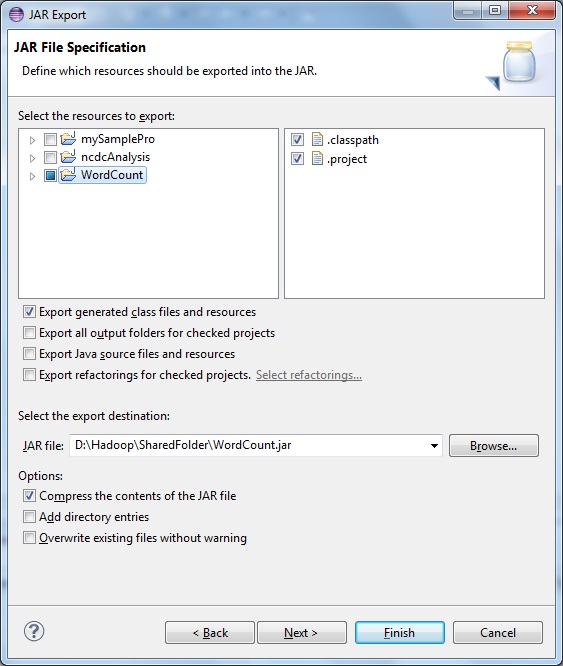
Right click on project -> export -> Java -> Select Jar files
You would reach to below window

Select first option- > Export generated class files and resource
Browse and select the destination to save JAR on local disk space.
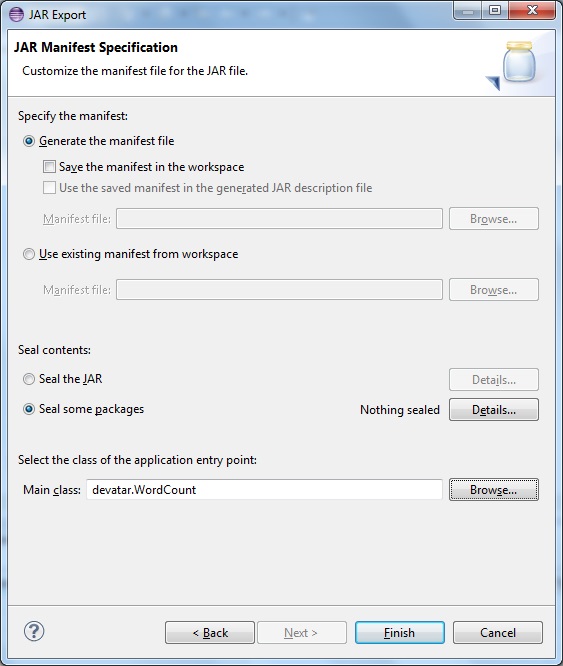
9. Proceed next with default setting

This step is very important.
You need to mention the Main driver Class name here, which is saved in manifest as path of entry point of the program.
If you don’t mention here, you need to mention the class path of the driver class as command line parameter while executing the job.
10. Click finish and your JAR file will be saved at located destination on local disk
11. Move the JAR file to Linux VM / AWS EC2 using WinSCP.
Now you have got the job on your cluster machine. Execute the job from command line using hadoop jar.
**************************************


Good article with easy to follow steps. Personally I prefer to run Hadoop on Linux but we’re not always in the situation to use these, whether it be for business reasons or simply a preference for Windows, so it’s good to know where to go if I either need to use Eclipse’s Hadoop plugin and/or create Jars in different environments.
Reblogged this on HadoopEssentials.